
How to Use a Color Visualizer to Find the Perfect Paint for Your Home
How to Use a Color Visualizer to Find the Perfect Paint for Your Home
Choosing the right paint color for your home can be a daunting task. With endless hues and shades available, it’s easy to feel overwhelmed. But thanks to modern technology, selecting the perfect color has never been easier. Enter the color visualizer — a powerful online tool that allows you to digitally “test” paint colors in your space before committing to a can of paint.
At Spectrum Painting and Concrete Coatings, we know how crucial it is to find the right color that will transform your home. Here’s a guide on how to use a color visualizer to streamline your decision-making process and ensure you’re thrilled with your choice.
What is a Color Visualizer?
A color visualizer is a digital tool that lets you upload photos of your space and apply different paint colors to walls, trims, or even furniture. This gives you a real-time preview of how the color will look in your home without any actual painting or mess. It’s an effective way to experiment with different shades and find a color palette that complements your style.
Steps to Use a Color Visualizer
- Upload a Photo of Your Space For the most accurate preview, upload a clear, well-lit photo of the room or area you plan to paint. Make sure the image is high quality so the tool can correctly map the surfaces and apply colors precisely. You can also upload a photo of your exterior to find the perfect color for your home!
- Select Your Paint Colors Browse the virtual color library, which includes thousands of shades. Try different variations of neutral tones, bold colors, or muted pastels. You can also search by specific color names or even look for inspiration from popular color trends.
- Apply the Colors Most color visualizers allow you to “paint” walls, ceilings, and trims with a click. Experiment with different combinations — try a bold accent wall or a two-tone design. This is your chance to see how different colors interact with lighting and decor. You can also check out exterior color with your landscaping, patio furniture, etc.
- Save, Share, and Compare Once you’ve created a few options, save your favorite color schemes. You can compare different looks side-by-side or share them with family, friends, or your painting contractor for feedback.
Benefits of Using a Color Visualizer
- No Guesswork: A color visualizer takes the guesswork out of choosing the right paint. You’ll get a clear visual of how your space will look, which helps to avoid costly mistakes or regret.
- Test Colors with Ease: You can try out dozens of colors in minutes without buying multiple sample cans or painting test patches on your walls.
- Save Time and Money: By previewing colors digitally, you can quickly narrow down your options and avoid unnecessary trips to the store.
- Confidence in Your Choice: You can confidently move forward with your project, knowing you’ve already seen how your chosen color will look in your home.
Get Expert Help from Spectrum Painting
While our color visualizer is a fantastic starting point, nothing beats professional advice. At Spectrum Painting and Concrete Coatings, we can help you refine your color choices and provide expert guidance on which shades will work best in your space. Plus, our team of experienced painters can bring your vision to life with flawless results.
Ready to take the plunge and give your home a fresh new look? Contact us today for a consultation, and let us help you achieve the perfect paint finish.
Using a color visualizer makes painting projects easier and more fun. With a few clicks, you can find the ideal color scheme that transforms your home, and with Spectrum Painting on your side, you’re guaranteed a beautiful, high-quality finish!

Fall-Inspired Paint Colors: Transform Your Home with the Warmth of Autumn
Fall-Inspired Paint Colors: Transform Your Home with the Warmth of Autumn
As the crisp air of fall sets in, it’s the perfect time to take inspiration from nature’s vibrant palette and bring those warm, inviting tones into your home. The changing leaves, cozy evenings, and pumpkin-spiced everything make this season a favorite for many. Why not capture that same warmth and comfort with a fresh coat of paint? Here are some fall-inspired paint colors that can transform your home into a cozy retreat.
1. Rich Earthy Browns

Nothing says autumn like the rich, earthy tones of brown. Inspired by tree bark and fallen leaves, shades like walnut, chestnut, and cocoa create a sense of groundedness and comfort. These shades are perfect for living rooms or bedrooms where you want a warm, soothing environment. Pair with off-white or beige accents for a sophisticated look.
2. Golden Mustard and Ochre
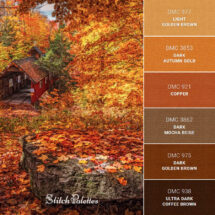
Take a cue from the golden hues of fall foliage with deep yellows like mustard or ochre. These colors can add a bold statement to a kitchen or dining area, bringing energy and warmth to social spaces. When combined with deep wood tones and soft lighting, mustard walls create an inviting and lively atmosphere perfect for entertaining.
3. Burnt Orange and Terracotta

Nothing says fall more than the classic orange shades we see in pumpkins and autumn leaves. Burnt orange and terracotta shades evoke the warmth of a fall sunset. These tones work wonderfully in entryways, kitchens, or accent walls, creating an instant sense of warmth and welcoming. Pair these with earthy neutrals or deep greens to complete the autumn vibe.
4. Deep Greens

Fall isn’t just about reds and oranges; the forest greens that linger as leaves turn are equally stunning. Deep, rich greens like olive, sage, or forest green can give your space a grounded and luxurious feel. They work beautifully in home offices, dining rooms, or even as cabinetry in kitchens. Green pairs exceptionally well with brass or gold hardware, adding a touch of elegance.
5. Warm Neutrals

Warm neutrals like creamy beige, taupe, and soft greys are ideal for those looking for a subtle autumn-inspired refresh. These colors create a serene backdrop and allow you to play with bolder accessories like pillows, throws, and artwork that bring in the season’s hues. These shades are also timeless, making them a perfect choice for those looking for longevity in their color choices.
6. Cranberry and Deep Reds

Inspired by fall fruits and cozy fireside evenings, cranberry and deep red hues add drama and richness to any space. These bold colors are perfect for a dining room or accent wall, giving the room a sense of sophistication and warmth. Pair with gold or brass accents for a luxurious feel.
7. Soft Pumpkin and Rust

For a more subtle take on fall colors, soft pumpkin and rust hues provide a warm yet understated vibe. These tones are perfect for adding a touch of autumn without overwhelming the space. Use them in bedrooms, living rooms, or even bathrooms for a cozy, rustic feel.
Bonus Tip: Consider the Mood!

When choosing a fall-inspired paint color, think about the mood you want to create in each room. Earthy tones bring a sense of calm and relaxation, while rich reds and yellows add energy and vibrancy. Whatever color you choose, be sure it complements your home’s natural lighting and the overall style of your décor.
—
Why Fall is the Perfect Time for a Paint Project
Autumn is not only inspiring but also an ideal time for a painting project. The cooler temperatures and lower humidity levels mean your paint will dry evenly and more quickly, leading to a flawless finish. Plus, as the season shifts indoors, it’s the perfect time to refresh your space for the cozy months ahead.
At Spectrum Painting, we can help you choose the perfect fall-inspired palette for your home and give your space the warm, inviting update it deserves. Contact us today to schedule your painting consultation and bring the beauty of the fall season into your home!
By embracing the colors of the season, you can create a home that feels cozy and welcoming, even as the days get cooler. Whether you go bold with burnt orange or keep it subtle with warm neutrals, fall is a wonderful time to refresh your space and capture the essence of autumn indoors

Preparing Your Home for Fall: Essential Tips for a Cozy and Comfortable Season
Preparing Your Home for Fall: Essential Tips for a Cozy and Comfortable Season
As the vibrant hues of summer begin to fade and the crispness of fall settles in, it’s time to prepare your home for the colder months ahead. Fall is the perfect season to cozy up your living spaces, perform essential maintenance tasks, and create a warm, inviting atmosphere. Here’s how you can get your home ready for the fall season.
1. Inspect and Seal Windows and Doors
As temperatures drop, you’ll want to ensure that your home stays warm and energy-efficient. Begin by inspecting your windows and doors for drafts. Use weather stripping, caulking, or draft stoppers to seal any gaps that might allow cold air to seep in. Not only will this keep your home warmer, but it will also help reduce your energy bills.
2. Clean and Inspect the Gutters
Falling leaves can quickly clog your gutters, leading to water damage and potential roof issues. Before the season is in full swing, take the time to clean out your gutters and downspouts. Remove any leaves, twigs, and debris, and ensure that water can flow freely. It’s also a good idea to inspect your gutters for any damage and make necessary repairs.
3. Service Your Heating System
Before the cold weather arrives, schedule a professional inspection of your heating system. Whether you have a furnace, heat pump, or another type of heating system, regular maintenance is crucial for ensuring it operates efficiently. Replace filters, check for any leaks or issues, and test your thermostat to make sure everything is in working order.
4. Prepare Your Fireplace
If you have a fireplace, now is the time to prepare it for the cozy fires ahead. Have your chimney cleaned and inspected by a professional to prevent any buildup of creosote, which can pose a fire hazard. Stock up on firewood, and make sure you have a good supply of kindling and matches. Don’t forget to check your smoke and carbon monoxide detectors as well.
5. Bring in Outdoor Furniture
As the weather cools, it’s time to bring in or cover any outdoor furniture. Clean and store cushions, and protect your furniture from the elements by covering it with weather-resistant covers. This will help prolong the life of your outdoor items and keep them looking fresh for next season.
6. Add Warmth with Seasonal Decor
One of the joys of fall is the opportunity to transform your home with seasonal decor. Swap out light summer linens for cozy blankets, throw pillows, and rugs in rich, warm colors. Incorporate fall-inspired accents like pumpkins, candles, and wreaths to create a welcoming and festive atmosphere. Consider layering textures like wool, flannel, and faux fur to enhance the coziness of your space.
7. Prepare Your Lawn and Garden
Fall is a critical time for lawn care, as it sets the stage for a healthy yard in the spring. Rake up fallen leaves regularly to prevent them from smothering your grass. Aerate your lawn to improve soil health, and apply a fall fertilizer to encourage strong root growth. Don’t forget to plant any fall bulbs, such as tulips or daffodils, for a burst of color next spring.
8. Check and Reverse Ceiling Fans
Did you know that your ceiling fan can help keep your home warmer in the fall and winter? Most ceiling fans have a reverse switch that changes the direction of the blades. Set your fan to rotate clockwise during the fall and winter months to push warm air down from the ceiling, helping to keep your rooms warm and reduce heating costs.
9. Winterize Outdoor Faucets and Sprinkler Systems
As temperatures begin to dip, it’s important to winterize your outdoor faucets and sprinkler systems to prevent freezing and potential damage. Drain and disconnect hoses, and turn off the water supply to exterior faucets. For sprinkler systems, follow the manufacturer’s instructions for winterization, or consider hiring a professional to ensure the job is done correctly.
10. Stock Up on Cold Weather Essentials
Fall is the time to stock up on essentials for the colder months ahead. Make sure you have a good supply of firewood, salt or sand for icy walkways, and warm blankets. It’s also wise to check your emergency kit and ensure it’s well-stocked with flashlights, batteries, non-perishable food, and other necessities in case of a winter storm.
Preparing your home for fall is all about creating a cozy, comfortable environment while ensuring your property is ready for the colder weather. By taking care of these tasks now, you can enjoy the beauty of the season with peace of mind, knowing your home is well-prepared for whatever fall and winter may bring. So grab a pumpkin spice latte, and start checking off your fall home maintenance list today!

DIY vs. Professional Painting: What You Need to Know
DIY vs. Professional Painting: What You Need to Know
Painting is one of the most effective ways to transform a space, whether you’re refreshing a single room or giving your entire home a new look. When it comes to painting, many homeowners face a common dilemma: Should I tackle the project myself or hire a professional? Both DIY and professional painting have their advantages, but each also comes with its own set of challenges. In this article, we’ll explore the key factors to consider when deciding between DIY and professional painting.
1. Cost Considerations
- DIY: The primary appeal of DIY painting is cost savings. By purchasing your own paint, brushes, rollers, and other materials, you can potentially save a significant amount compared to hiring a professional. However, the costs can add up quickly if you need to buy specialized tools or if you make mistakes that require additional paint or repairs.
- Professional: Hiring a professional painter typically involves higher upfront costs, as you’re paying for their time, expertise, and equipment. However, professionals often have access to trade discounts on paint and materials, which can help offset some of the expense. Plus, the quality of the finished job may be higher, potentially saving you money in the long run by avoiding the need for touch-ups or redoing the work.
2. Time and Effort
- DIY: Painting a room might seem like a straightforward weekend project, but it often takes longer than anticipated. Prep work—such as patching holes, sanding, and taping off areas—can be time-consuming. Additionally, achieving a smooth, even finish requires patience and attention to detail. If you’re short on time or energy, the DIY route might lead to frustration or a rushed job.
- Professional: Professional painters have the experience and manpower to complete projects efficiently. They can often finish a job in a fraction of the time it would take an inexperienced DIYer, allowing you to enjoy your newly painted space sooner. Moreover, professionals handle all the prep work and cleanup, saving you a considerable amount of effort.
3. Quality of Results
- DIY: If you’re meticulous and willing to invest the time to learn proper techniques, you can achieve good results with a DIY paint job. However, common pitfalls like uneven coverage, brush marks, or paint drips can detract from the overall appearance. DIYers may also struggle with challenging areas such as high ceilings, trim, or intricate details.
- Professional: Professional painters bring years of experience to the table, which often translates into superior results. They have the skills to handle complex tasks, such as creating sharp lines, matching colors perfectly, and applying even coats. A professional finish can elevate the look of your home and enhance its overall value.
4. Risk and Safety
- DIY: Painting may seem low-risk, but there are safety concerns to consider, especially when working on ladders, dealing with fumes, or handling heavy equipment. DIYers must take precautions to avoid accidents or injuries, particularly in hard-to-reach areas like stairwells or exterior walls.
- Professional: Professionals are trained in safety protocols and have the necessary equipment to handle hazardous situations, such as working at heights or in poorly ventilated areas. By hiring a professional, you reduce the risk of accidents and ensure that the job is completed safely.
5. Customization and Expertise
- DIY: One of the advantages of DIY painting is that you have complete control over the project. You can choose your colors, experiment with techniques, and make changes on the fly. However, without professional expertise, you may not be aware of the latest trends, best products, or most effective methods.
- Professional: A professional painter brings not only technical skill but also valuable advice. They can recommend the best types of paint for your specific needs, suggest color schemes that complement your home’s design, and provide insights into the latest trends. This guidance can help you achieve a look that’s both stylish and durable.
6. Long-Term Benefits
- DIY: A successful DIY project can be incredibly rewarding, giving you a sense of accomplishment and a personal connection to your home. However, the longevity of a DIY paint job may vary depending on the quality of the materials used and the application technique.
- Professional: Professional painters use high-quality materials and industry-standard techniques, which often result in a longer-lasting finish. Additionally, many professionals offer warranties or guarantees on their work, providing peace of mind that your investment is protected.
When deciding between DIY and professional painting, consider your budget, time constraints, skill level, and desired outcome. While DIY painting can be a fun and cost-effective option for those who enjoy hands-on projects, hiring a professional ensures high-quality results with less hassle. If you’re looking for a reliable painting service, consider Spectrum Painting, where our team of experts is ready to bring your vision to life with precision and care.
Whether you choose to DIY or hire a professional, the most important thing is to plan carefully, use quality materials, and enjoy the process of transforming your space. Happy painting!
The Ultimate Guide to Refinishing, Refacing, and Replacing Cabinets: Which Option Saves You the Most Money?
The Ultimate Guide to Refinishing, Refacing, and Replacing Cabinets: Which Option Saves You the Most Money?
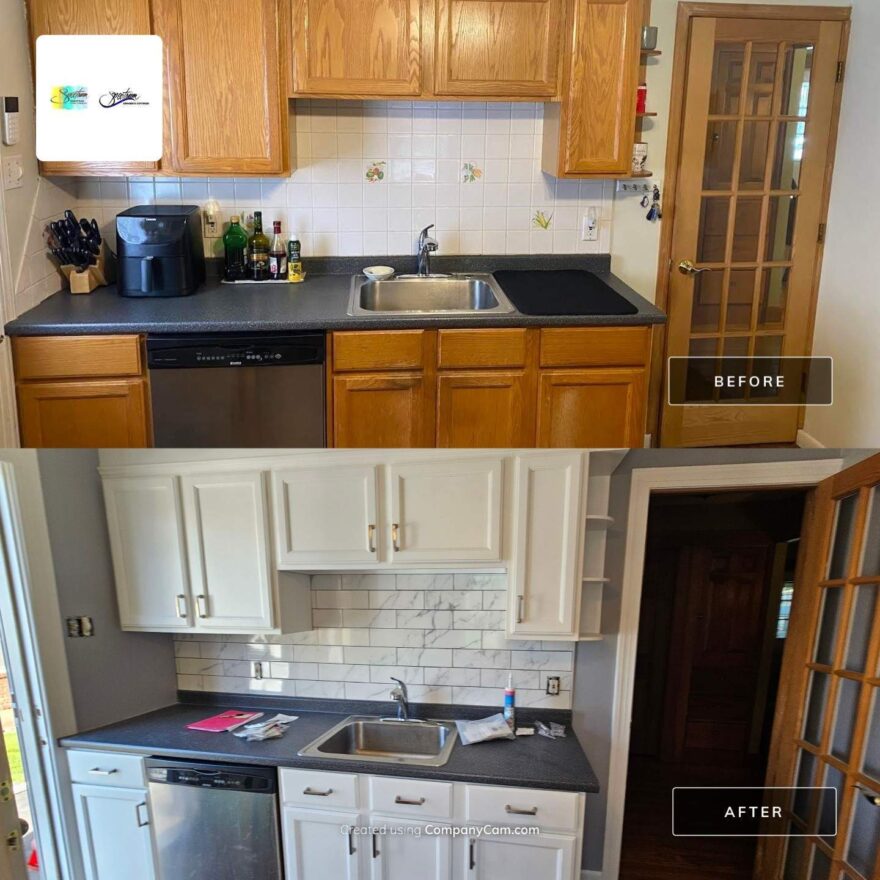
When it comes to updating your kitchen or bathroom, cabinets often take center stage. They play a significant role in the room’s overall aesthetic and functionality. But when your cabinets start to look outdated or worn, you’re faced with a decision: should you refinish, reface, or replace them? Each option has its pros and cons, but if saving money is your top priority, refinishing might be the best choice. Let’s dive into the differences between these three options and explore how much you can save by opting to refinish your cabinets.
1. Refinishing Cabinets: A Cost-Effective Facelift
What Is It? Refinishing involves sanding down the existing cabinet doors and frames, then applying a new finish or paint. This process revitalizes the cabinets by refreshing their appearance without altering their structure or design.
Cost Refinishing is by far the most affordable option. On average, homeowners can expect to spend between $1,500 and $4,000, depending on the size of the kitchen and the type of finish chosen.
Benefits
- Cost-Effective: Refinishing is significantly cheaper than refacing or replacing.
- Quick Turnaround: The process can be completed in a few days.
- Eco-Friendly: Since you’re using your existing cabinets, this option is environmentally friendly, reducing waste.
Considerations
- Limited Customization: You can’t change the style or design of the cabinets; you’re simply refreshing the existing ones.
- Surface Condition: Refinishing works best if your cabinets are in good structural condition. It won’t fix issues like warping or water damage.
2. Refacing Cabinets: A Middle-Ground Option
What Is It? Refacing involves replacing the cabinet doors and drawer fronts while keeping the existing cabinet boxes. The visible parts of the cabinets are given a new veneer or laminate, effectively giving your kitchen a brand-new look without the full cost of replacement.
Cost Refacing is more expensive than refinishing but still more affordable than a complete replacement. Costs typically range from $6,000 to $14,000.
Benefits
- Customization: You can choose new styles, colors, and materials for the doors and drawer fronts.
- Less Disruptive: Since you’re not removing the cabinet boxes, the process is quicker and less messy than a full replacement.
- Modern Look: Refacing can dramatically update the look of your kitchen.
Considerations
- Higher Cost: While cheaper than replacing, refacing is still a significant investment.
- Cabinet Condition: The existing cabinet boxes must be in good condition; otherwise, refacing might not be worth the expense.
3. Replacing Cabinets: The All-Inclusive Option
What Is It? Replacing cabinets involves completely removing the old cabinets and installing new ones. This option gives you the freedom to redesign your kitchen layout, choose entirely new materials, and customize the cabinets to your liking.
Cost Replacing cabinets is the most expensive option, with costs ranging from $12,000 to $30,000 or more, depending on the size of your kitchen, the materials used, and the complexity of the installation.
Benefits
- Complete Customization: You have full control over the design, layout, and materials.
- New Functionality: You can improve the functionality of your kitchen by redesigning the layout and adding modern features like soft-close drawers or pull-out shelves.
- Increased Home Value: A full cabinet replacement can significantly increase your home’s value, especially if it’s part of a larger kitchen remodel.
Considerations
- High Cost: This is the most expensive option by far, both in terms of materials and labor.
- Time-Consuming: Replacing cabinets is a lengthy process that can take weeks or even months, depending on the complexity of the project.
- Disruption: Your kitchen will be out of commission for a while, which can be inconvenient.
Comparing the Costs: How Much Can You Save?
Refinishing vs. Refacing
- Savings: Refinishing your cabinets can save you 60-80% compared to refacing.
- Example: If refacing costs $10,000, refinishing the same cabinets might only cost around $2,000.
Refinishing vs. Replacing
- Savings: Refinishing can save you 70-90% compared to replacing.
- Example: If replacing cabinets costs $20,000, refinishing could save you up to $18,000.
Refacing vs. Replacing
- Savings: Refacing can save you 50-60% compared to replacing.
- Example: If replacing costs $20,000, refacing might only cost $10,000.
Conclusion: Refinishing Wins for Budget-Conscious Homeowners
If you’re looking to update your kitchen or bathroom without breaking the bank, refinishing is the clear winner in terms of cost savings. It’s a practical, eco-friendly option that can breathe new life into your cabinets for a fraction of the cost of refacing or replacing. While it may not offer the same level of customization or modern features, it’s an excellent choice for homeowners who want to freshen up their space without spending a fortune.
If you’re considering refinishing your cabinets and need expert advice or services, Spectrum Painting and Concrete Coatings is here to help. Our team of professionals can guide you through the process and ensure that your cabinets look stunning for years to come.
Ready to give your cabinets a fresh new look? Contact us today for a free consultation and see how much you can save with Spectrum Painting and Concrete Coatings!

Seasonal Painting: When is the Best Time to Paint Your Home?
Seasonal Painting: When is the Best Time to Paint Your Home?
Painting your home is an investment in its aesthetic appeal and protection. But did you know that timing is everything when it comes to painting? Choosing the right season can significantly impact the quality and longevity of the paint job. Let’s explore when is the best time to paint your home, and why partnering with experts like Spectrum Painting can make all the difference.
Spring: A Fresh Start
Spring is often considered an ideal time for painting. The weather is mild, and the temperatures typically range between 50°F and 85°F, which is perfect for most paints to cure properly. Humidity levels are moderate, which helps the paint adhere smoothly to surfaces without drying too quickly or too slowly.
Spring is also a time when many homeowners are eager to refresh their spaces after the long winter months. If you’re planning on giving your home a new look, early spring is an excellent time to schedule your painting project with professionals like Spectrum Painting. Their expert team can help you choose the right colors and finishes to brighten up your home for the season.
Summer: Warm and Bright
Summer provides longer days and plenty of sunlight, which means more time to work on painting projects. The dry conditions and warmer temperatures (ideally below 90°F) allow paint to dry and cure faster, making summer another great option for exterior painting.
However, summer heat can be intense, especially in certain regions. It’s essential to work with a company that understands how to navigate these conditions. Spectrum Painting’s team knows the ins and outs of painting in the summer, ensuring that your home’s exterior is painted during the cooler parts of the day to avoid issues like blistering or peeling.
Fall: The Golden Season
Fall is often referred to as the “golden season” for painting. The weather is still mild, and the temperatures are stable, usually ranging between 60°F and 80°F. The lower humidity levels compared to summer create an optimal environment for paint to adhere and cure.
Fall is also a time when many homeowners are preparing their homes for the winter months. A fresh coat of paint not only enhances curb appeal but also adds a layer of protection against the upcoming harsh weather. Spectrum Painting can help you take advantage of the fall season, offering expert advice on the best paint products and techniques to ensure your home is winter-ready.
Winter: A Time for Interior Projects
While winter might not be the best time for exterior painting due to cold temperatures and moisture, it’s an excellent season for tackling interior painting projects. With lower humidity levels indoors and less foot traffic, paint dries quickly and evenly.
Winter is the perfect time to refresh your home’s interior, whether you’re looking to create a cozy living room or a vibrant kitchen. Spectrum Painting offers comprehensive interior painting services, ensuring that your home looks its best year-round, even when it’s too cold to work outside.
Timing Matters
When it comes to painting your home, timing is crucial. Whether you’re planning to paint the exterior in the mild spring or fall seasons or refreshing your interior during the winter, understanding the best time to paint can make a significant difference in the outcome of your project.
Partnering with professionals like Spectrum Painting ensures that your project is handled with expertise, regardless of the season. Their knowledge of seasonal conditions, combined with their commitment to quality, guarantees a paint job that will enhance your home’s beauty and durability for years to come.
So, when is the best time to paint your home? The answer depends on your specific needs and goals, but with Spectrum Painting by your side, any season can be the right season for a fresh, beautiful home.

How to Prepare Your Home for Sale with the Right Paint Colors
How to Prepare Your Home for Sale with the Right Paint Colors
When it comes to selling your home, first impressions are everything. Potential buyers form their opinions within moments of walking through the door, and the right paint colors can make all the difference. A fresh coat of paint is one of the most cost-effective ways to enhance your home’s appeal, but choosing the right colors can be tricky. Here’s how to prepare your home for sale with the perfect palette.
1. Understand the Power of Neutrals
Neutral colors are your best friend when preparing your home for sale. They create a blank canvas that allows buyers to envision themselves living in the space. Colors like soft grays, beiges, and off-whites are universally appealing and can make rooms feel larger and more inviting. These shades also complement various styles and furnishings, making your home more attractive to a wider audience.
2. Boost Curb Appeal with the Right Exterior Colors
The exterior of your home is the first thing buyers see, so it’s essential to make a great first impression. A well-chosen exterior paint color can significantly boost curb appeal. Consider classic, neutral shades like light gray, taupe, or even a crisp white. Pair these with a bold front door color—such as deep blue, red, or black—to add a welcoming touch without overwhelming the senses.
3. Highlight Key Rooms with Subtle Accents
While neutral colors should dominate, you can still add personality to your home with subtle accent walls or rooms. Consider using a soft blue or green in bedrooms or bathrooms, as these colors are known to evoke calmness and relaxation. However, avoid overly bold or dark colors that may turn off potential buyers or make spaces feel smaller.
4. Don’t Forget the Trim and Ceilings
Often overlooked, the trim and ceilings play a crucial role in the overall appearance of your home. Freshly painted white trim can make rooms feel clean and polished. Similarly, a crisp white or very light ceiling color can make rooms appear taller and brighter. Be sure to refresh these areas when painting your home for sale.
5. Consider the Style and Location of Your Home
Your home’s style and location should influence your color choices. For instance, if you have a historic home, choosing period-appropriate colors can enhance its charm and appeal to buyers interested in classic homes. Similarly, homes in coastal areas might benefit from lighter, breezy colors like soft blues and sandy beiges, while urban homes might shine with a more modern, monochromatic palette.
6. Test Before You Commit
Before diving into a full paint job, always test your chosen colors in different areas of your home. Paint small sections of the wall and observe how the colors look at various times of the day under different lighting conditions. What looks great in the morning light might not be as appealing in the evening.
7. Hire Professionals for a Flawless Finish
Painting your home is an investment in its saleability, so it’s worth doing right. Hiring professional painters ensures a smooth, flawless finish that will impress buyers. At Spectrum Painting, we specialize in preparing homes for sale with expert color consultations and high-quality painting services. Our team can help you choose the perfect palette to make your home stand out in a competitive market.
8. Don’t Neglect the Small Details
Beyond walls and trim, consider painting other areas that might need a refresh. This could include kitchen cabinets, built-in shelving, or even the garage door. Small details like these can make a big impact on how buyers perceive the overall upkeep and care of your home.
9. Keep It Consistent
Consistency is key when choosing paint colors. Stick to a cohesive color scheme throughout your home to create a sense of flow and unity. Avoid jarring transitions between rooms that could disrupt the overall aesthetic and potentially turn buyers away.
10. Final Touches: Staging with Color
Once your painting is complete, use color strategically in your staging. Complement the walls with decor and furnishings that enhance the overall color scheme. For instance, if your walls are a soft gray, add throw pillows, artwork, and rugs in coordinating shades to tie everything together.
Choosing the right paint colors is a simple yet powerful way to prepare your home for sale. By opting for neutral shades, highlighting key areas with subtle accents, and ensuring a professional finish, you can maximize your home’s appeal and attract potential buyers. If you’re ready to get started, Spectrum Painting is here to help make your home shine in the market.
Incorporating these tips into your home sale preparation can help you sell faster and at a better price. Whether you’re refreshing a single room or giving your entire home a new look, the right paint colors can be a game-changer. Happy selling!
How to Maintain Your Painted Surfaces
How to Maintain Your Painted Surfaces
Painting your home or office is an investment in both aesthetics and protection. Whether you’ve recently updated your walls with a fresh coat of paint or have painted surfaces that have been around for a while, maintaining them is key to ensuring they look great and last for years. This guide will walk you through essential tips and techniques for keeping your painted surfaces in top condition.
1. Regular Cleaning
One of the most effective ways to maintain painted surfaces is regular cleaning. Dust, dirt, and grime can accumulate over time, dulling the paint and even leading to damage if left unattended.
- Dusting: Use a soft, dry cloth or a microfiber duster to gently remove dust from walls and other painted surfaces. This should be done weekly to prevent buildup.
- Washing: For deeper cleaning, especially in high-traffic areas like kitchens or hallways, use a mixture of mild soap and water. Avoid harsh chemicals that can strip the paint. Use a soft sponge to gently scrub the surface, and always rinse with clean water afterward.
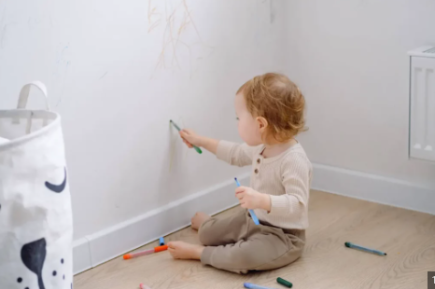
2. Addressing Stains and Marks
Stains and marks are inevitable, especially in homes with kids or pets. However, they can be managed with a few simple steps:
- Scuff Marks: Use a magic eraser or a soft cloth dipped in a mixture of baking soda and water to gently rub away scuff marks.
- Grease Stains: In kitchens, grease stains can be a challenge. A mixture of vinegar and water can help break down the grease without damaging the paint.
- Crayon Marks: If your little ones have turned your walls into a canvas, a baking soda paste can help remove crayon marks. Apply it gently with a soft cloth, then rinse with water.
3. Preventing Damage
Prevention is always better than cure. Here are some tips to help protect your painted surfaces from damage:
- Use Protective Pads: Place felt pads under furniture to prevent scratches and scuffs on painted surfaces.
- Avoid Direct Sunlight: Prolonged exposure to sunlight can cause paint to fade. Use curtains or blinds to protect painted surfaces from harsh UV rays.
- Manage Humidity: High humidity levels can cause paint to peel or bubble. Use dehumidifiers in areas with excess moisture, like bathrooms or basements.
4. Touch-Up Techniques
No matter how careful you are, small chips and scratches are bound to happen. Touching up these areas promptly can prevent further damage and keep your paint job looking fresh.
- Matching Paint: Always keep a small amount of the original paint for touch-ups. If you don’t have any leftover paint, take a sample to your local paint store to get a perfect match. Spectrum will leave any leftover paint in a convenient spot with it labeled for the correspoding room.
- Application: Use a small brush or a cotton swab for minor touch-ups. Apply the paint lightly, building up thin layers until the area blends with the surrounding paint.
5. Repainting When Necessary
Even with the best care, painted surfaces will eventually need a fresh coat. Here’s how to know when it’s time to repaint:
- Signs of Wear: Fading, cracking, or peeling are clear signs that your paint needs attention.
- High-Traffic Areas: Hallways, kitchens, and bathrooms may need to be repainted more frequently due to higher wear and tear.
- Changing Aesthetics: Sometimes, a new color or finish is needed to refresh your space or update your style.
Conclusion
Maintaining your painted surfaces doesn’t have to be a daunting task. With regular cleaning, prompt attention to stains and marks, preventive measures, and the occasional touch-up, your painted surfaces can remain vibrant and beautiful for years. Remember, the key is consistency. By incorporating these practices into your routine, you’ll protect your investment and keep your home or office looking its best.
Whether you’re a homeowner looking to maintain the beauty of your living space or a business owner wanting to keep your premises pristine, following these tips will ensure your painted surfaces stand the test of time. Happy painting!

Understanding the Painting Process: From Consultation to Completion
Understanding the Painting Process: From Consultation to Completion
Painting a home or business is a significant investment that can transform the appearance and feel of a space. However, understanding the entire process, from the initial consultation to the final brushstroke, is essential for achieving the best results. Here’s a detailed look at each stage of the painting process.
1. Initial Consultation
Understanding Your Needs
The process begins with an initial estimate appointment, where you meet with a painting contractor to discuss your needs and preferences. This is the time to communicate your vision, whether it’s a complete color change or a fresh coat to revitalize your current look.
Site Assessment
The contractor will assess the site, considering factors like the size of the area to be painted, the condition of the surfaces, and any special requirements such as repairs or treatments. This assessment helps in creating an accurate and comprehensive quote.
2. Color Selection and Planning
Choosing the Right Colors
Selecting the right colors can be overwhelming, but many contractors offer color consultation services. They can provide samples and suggest shades that complement your existing decor and lighting. Spectrum is happy to offer a free color consultation with our expert with any job.
Detailed Proposal
Once the colors are chosen, the contractor will present a detailed proposal outlining the scope of work, materials to be used, project timeline, and cost. This proposal ensures that you understand what to expect and helps avoid any surprises.
3. Preparation
Surface Preparation
Proper preparation is crucial for a long-lasting paint job. This involves cleaning the surfaces, scraping off old paint, sanding rough areas, and filling cracks and holes. In some cases, a primer is applied to ensure better adhesion and durability of the paint.
Protecting Your Space
Furniture and fixtures are moved or covered to protect them from paint splatters. Drop cloths are laid down to safeguard floors, and tape is used to protect edges and trim.
4. Painting
Applying the Paint
With everything prepped, the painting begins. Professional painters use a variety of techniques, including brushing, rolling, and spraying, depending on the surface and type of paint. Multiple coats are often applied to achieve an even and vibrant finish.
Quality Control
After the initial coats, the painters inspect their work for any missed spots or imperfections. Touch-ups are done as needed to ensure a flawless finish.
5. Cleanup and Inspection
Cleaning Up
Once the painting is completed, the crew will clean up the area. This includes removing protective coverings, cleaning tools, and ensuring no paint splatters or spills are left behind.
Final Inspection
A final inspection is conducted with the contractor and the client. This walkthrough ensures that all work has been completed to your satisfaction and any last-minute touch-ups are addressed.
6. Project Completion
Client Approval
After the final inspection, you will be asked to approve the work. This step is crucial for ensuring that you are completely satisfied with the results.
Aftercare and Maintenance Tips
The contractor may provide aftercare and maintenance tips to help you keep your new paint job looking fresh for years to come. This can include advice on cleaning painted surfaces and when to consider future touch-ups or repaints.
Understanding the painting process from consultation to completion helps set clear expectations and ensures a smooth and successful project. By working closely with your contractor and following these steps, you can achieve a beautiful, long-lasting finish that enhances the aesthetic appeal of your space.
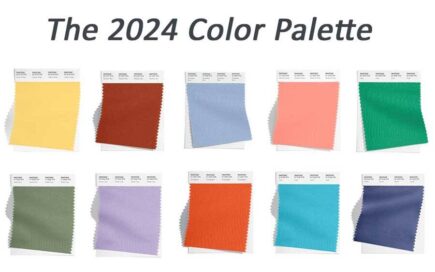
Latest Trends in Interior Painting for 2024
Latest Trends in Interior Painting for 2024
As we’re more than halfway through 2024, the world of interior painting is witnessing a fascinating blend of innovation and nostalgia. Homeowners and designers alike are exploring bold color choices, sustainable practices, and unique finishes that reflect both personal style and broader trends. Let’s dive into the latest trends that are set to redefine interior spaces this year.
1. Bold and Vibrant Colors
Gone are the days of playing it safe with neutrals. 2024 is all about making a statement with bold and vibrant colors. Deep blues, rich greens, and striking reds are becoming popular choices for accent walls and entire rooms. These colors add personality and depth to any space, making a powerful impact.
2. Earthy Tones and Natural Hues
While bold colors are trending, there’s also a growing appreciation for earthy tones and natural hues. Warm browns, soft beiges, and muted greens bring a sense of calm and connection to nature. These colors are perfect for creating cozy, inviting spaces that feel grounded and serene.
3. Textured Finishes
Flat, one-dimensional walls are being replaced by textured finishes that add character and visual interest. Techniques like sponge painting, rag rolling, and metallic finishes are gaining popularity. These methods create unique patterns and surfaces that can transform a simple wall into a work of art.
4. Sustainable and Eco-Friendly Paints
Sustainability is more than just a buzzword; it’s a crucial consideration in modern home design. Eco-friendly paints with low or zero VOCs (volatile organic compounds) are becoming the go-to choice for health-conscious homeowners. Brands are also focusing on natural and recycled materials, ensuring that beauty doesn’t come at the expense of the environment.
5. Monochromatic Schemes
Monochromatic color schemes, where different shades of the same color are used throughout a room, are making a comeback. This approach creates a harmonious and sophisticated look, making spaces feel cohesive and thoughtfully designed. Shades of blue, gray, and even warmer tones like terracotta are popular choices for this trend.
6. Dark Ceilings
Traditionally, ceilings have been painted white or in light colors to make a room feel larger. However, 2024 is seeing a shift towards dark ceilings. Colors like deep navy, charcoal, and even black are being used to create a dramatic, enveloping effect. This trend works particularly well in rooms with high ceilings or ample natural light.
7. Accent Walls with a Twist
Accent walls remain a popular trend, but with a twist. Instead of a single bold color, homeowners are opting for patterned or mural accent walls. Geometric patterns, floral designs, and even custom murals can turn a plain wall into a focal point that tells a story.
8. Multi-Functional Spaces
As more people work from home, the need for multi-functional spaces is growing. Paint is being used creatively to delineate different areas within a single room. For example, a home office nook might be painted a different color than the rest of the living room, visually separating the space without the need for physical barriers.
9. Personalized Palettes
Personalization is key in 2024. Homeowners are moving away from cookie-cutter designs and are instead choosing color palettes that reflect their individual tastes and lifestyles. Custom color mixing and bespoke shades allow for a truly unique and personal touch in interior design.
10. Metallic Accents
Metallic paints and finishes are adding a touch of glamour and sophistication to interiors. Gold, silver, and bronze accents can be used on everything from furniture to wall trims, creating a luxurious feel. These metallic touches catch the light beautifully, adding a dynamic element to the room.
The interior painting trends for 2024 are all about expressing individuality, embracing sustainability, and creating spaces that are both functional and beautiful. Whether you’re drawn to bold colors or prefer the subtleness of natural hues, there’s a trend to suit every taste. As you plan your next painting project, consider incorporating some of these exciting trends to keep your home stylish and up-to-date. If choosing colors is a bit confusing for you, Spectrum is happy to offer our color consultation services with all our interior and exterior projects!